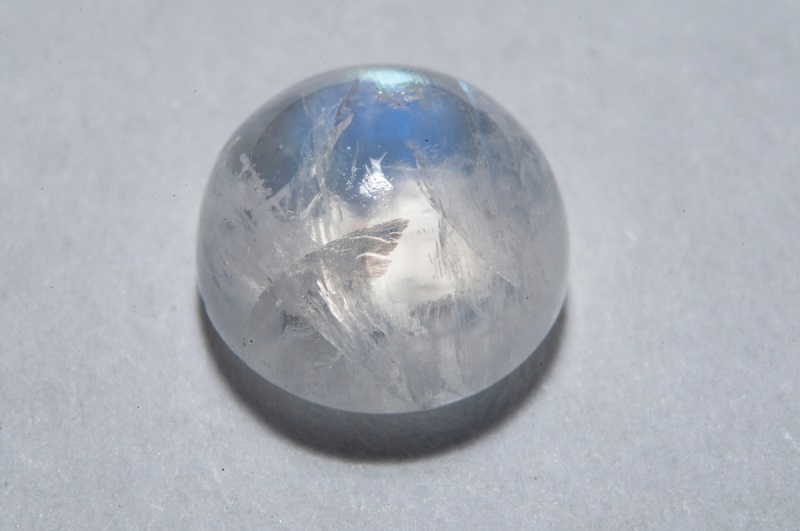
Moonstone is a beautiful stone, and one of the most favored of the feldspar family. It’s used in jewelry and decorative objects, takes a high polish, and has that inner glow few stones can match. Of course, if you only have rough material you’ll want to make it shine and bring out its inner beauty.
Tumblers are among the most common lapidary equipment found in homes, so the question here is simple: can you tumble moonstone?
Can You Tumble Moonstone?
Moonstone is hard enough that it tumbles well, but the material can be a bit tricky to deal with. Getting the most out of your collection is harder than it seems at first glance, however, due to some of the internal properties of moonstone.
Success boils down to a few different factors, so let’s explore them and help you get your rough moonstone to find its inner gleam.

Tips on How To Tumble Moonstone
Tip #1: Pick Tumbling Mates Carefully
Tumblers are cool and all, but often amateurs like to just stick in what they have. This can work if you’re just collecting a few, similar types of stone. For instance, it’s not uncommon for rockhounds to find a bunch of jasper and agate and throw it all in at the same time.
This isn’t a great strategy for working with moonstone. Instead, you should seek to only tumble moonstone with itself or with other stones that have a similar hardness. Moonstone sits at 6.0-6.5 on the Moh’s scale, making it softer than agate and high-grade jaspers. I don’t recommend sticking it in with your garden rocks, especially considering the expense.
If you don’t have enough moonstone to fill the tumbler by itself, you can add other similar minerals. Some good fits are the following:
- Labradorite- Identical hardness to moonstone in addition to being from the same family. Rainbow moonstone is actually just water-clear labradorite.
- Microcline- Or, specifically, amazonite which is a blue-green variety of microcline. Another good feldspar group mineral that can be tumbled with moonstone.
- Sunstone- Lower-grade sunstone rough is a good option for tumbling with moonstones. Higher grade material is almost universally cut for jewelry, and shouldn’t be tumbled.
- Nephrite- A mineral that isn’t a feldspar. Nephrite jade can be tumbled safely with moonstone and other feldspars due to similar hardness.
In general, those should make up your tumbling companions for the best end results. A few other minerals, such as pyrite, fit the bill on hardness but usually aren’t tumbled.
You can also use some slightly lower hardness material, in the 5.5-6.0 range. Just make sure that the moonstone is the hardest material in the tumbler load, since its a bit more valuable than the vast majority of stones.
Ideally your barrel will be full of just one material, but you can use other minerals with a similar hardness to fill out the load.
Tip #2: Choose Stones Carefully
Not every moonstone is made equal. Feldspar minerals often have a multitude of internal fractures, and that can cause the material to break even if you only have other similarly hard stones in there with it.
For the best end result, you can go through your stones carefully. Avoid anything with too many fractures, as they may break into very small pieces in the tumbler.
You can simply load the barrel with as much moonstone as you’d like without inspection as well, but if you’re pressed for space it’s best to only pick out the most solid appearing specimens to place in the tumbler.
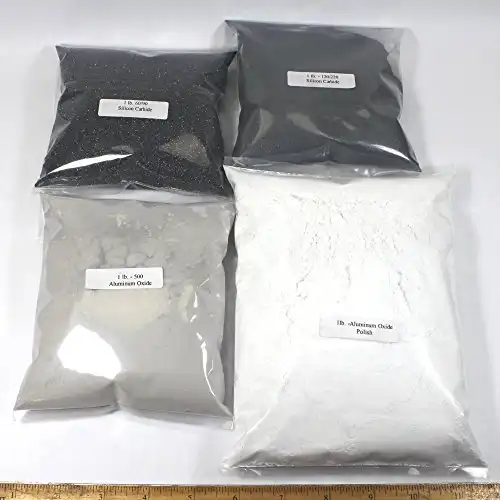
Tip #3: Use High-Quality Grit
I can’t count the number of times I’ve seen someone spend a ton of money on a tumbler and then use terrible grit. Bad quality grit is inconsistent, giving it a wider range of particle sizes, and creating problems with scratches on the stone.
National Geographic’s grit is a classic example of grit with lower quality. It’s found in those little tumbling kits it seems every kid ends up with at some point, and a lot of people just keep using it.
Don’t. Use a trusted brand like the stuff from the Rock Shed for better results.
Consistency is huge when it comes to getting a perfect tumble. You can certainly get a passable finish with the usual fare, but you’ll be surprised at the side-by-side comparison of the finish between the two.
Tip #4: Know Your Polish
Your final polish is extremely important, and you need to make sure that you have the right stuff. I’ve seen kits that only go up to 1200 grit, for instance, which is more of a pre-polish than a final polish.
You’ll be disappointed in the results if that’s where you stop.
The majority of polishes end up being in the 10,000-15,000 grit range, which is perfect for tumbling moonstones, especially if you do a “burnishing” step.
Just make sure your final stage is at a high enough grit. Most people and kits are fine, but I’ve seen people severely disappointed with a “final polish” that’s just not shiny enough. For a high-quality finish you’ll need to get into ultra-high grits, so double-check any abrasive kits you’re buying.
Tip #5: Run a Burnishing Cycle
Burnishing stones is a bit of a misnomer. Burnishing is generally a term applied to metalwork, where you kind of smooth out the metal through the use of a hard, smooth object. In tumblers you use stainless steel pins, outside of them everything from modified old carbide burrs to shaped pieces of agate are used.
With stone it’s just another term for polishing. We’re not going to be able to just grab an agate metal burnisher and start smoothing out the surface of the stone.
Thus, with stones, it can just be considered a final polishing cycle. It can make a big difference in the finish and doesn’t require you to add another 5-7 days to the cycle.
To determine if you need to run a final cycle, you should just rub the stone on a bit of denim or rag. Do so very quickly and vigorously then compare the finish to the rest of the stone.
Any improvement means there’s some room for a final cycle.
There are two main additives that are used:
- Borax- A cheap detergent that seems to work well. It’s added to water to make a relatively thick paste before being placed in the tumbler with the stones.
- Flaked/Grated Ivory Soap- Just run a bar of the soap through a grater and use that as tumbling media.
I use borax these days, mainly because I always have a box of it in reach in the workshop for use with silver.
Ivory soap seems to be the preferred option for those with a lot of tumbling experience, so I’ll defer to them. You just need to use a cheese grater or sharp knife to cut off a lot of tiny flakes.
The bars of soap can be a bit hard to grate when you first get them. Air will “dry” them out so that you can more easily cut them up into the required bits. Open the package and place them somewhere dry to “season” them for easier use in the future.
I’ve found that discount stores selling single bars (think Dollar Tree) often have soap that’s older and easier to work with right out of the box. Just fill-up the tumbler as normal, using soap instead of the normal grit or polish.
A burnishing cycle is usually 30-60 minutes. It’s an easy addition to get a bit more out of your moonstone’s polish.
Tip #6: Polish/Burnish With Distilled Water
On occasion, you’ll run into a problem where no matter what you do the stones just don’t shine as they should. They may even look perfect under magnification, which adds to the mystery.
This was my initial experience with tumbling in general.
They’re hard to see on the white surface of moonstone, but the evaporating water will leave behind calcium deposits. These deposits cover up the shine of the finish, which leaves you with a duller look even if the actual polish is perfect.
Use distilled water for the polishing and burnishing stages with your stones to avoid calcium staining. A lot of times you may not even need to burnish the stone if you use distilled water during the polishing phase.
The harder your local water, the more likely it is to create aesthetic problems with your stone. Just use distilled water at the end and avoid the issue altogether, you’ll be much happier with the final results!
- Online rock and mineral club for collectors of all levels!
- Find community with like-minded rock and mineral enthusiasts.
- Monthly Giveaways!
- Free Access to Entire Digital Library of Products (annual memberships)
