Not all crystals are easy to identify, and when we’re dealing with gemstones it can become a real mess. That said, there are a few different ways that you can get a good picture of what a stone is without having to take out a second mortgage for gemological equipment and classes.
So, let’s take a look at some ways you can learn how to identify rough sapphire!
The Important Stuff
What we’re checking here are the properties of the individual stone. Few of us have the resources sitting in the garage to be 100% certain but you can get pretty close by checking a few properties of the stone.
These properties will allow you to be relatively certain the stone is what you think it is, especially if you know where it came from.
Color isn’t a useful identifier in this case. Corundum, the mineral which makes up sapphire, comes in a wide variety of colors. While “fancy” sapphires aren’t the first thing most people think of, they’re a lot more common than the deep blue we normally associate with the gem.
So, before we move on a bit, let’s take a look at the quantifiable properties that will let you know a stone is a sapphire:
- Specific Gravity – 3.98 – 4.06 g/cm³
- Moh’s Hardness – 9.0
- Streak Color – Colorless
- Luster – Vitreous (glass-like)
Ruby will also fit into the above since it’s simply a red variety of corundum. Every other color we simply call sapphire.
If you get all four of the above properties on point, you’re probably looking at a sapphire. That said, no one is going to take your word for it so you’ll still need a lab certificate to be 100% certain if you’re planning on selling an exceptional rough sapphire.
Get a Look With a Loupe
A 10x loupe is a potent weapon for the identification of stones. Look for one with a light to make things easier on yourself. You can go up higher in magnification, those up to 40x are readily available, but for most purposes 10x will be fine.
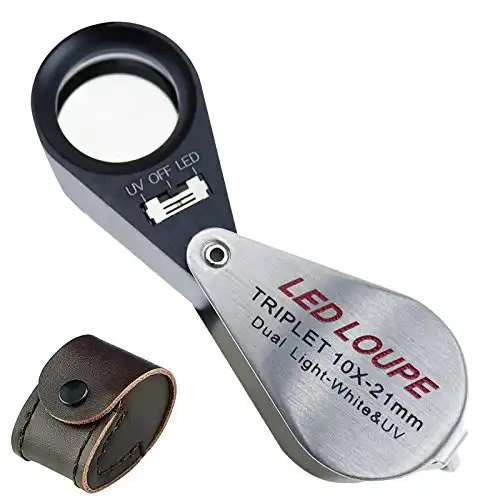
A loupe will reveal the biggest tell that a gemstone is fake without much effort. If you’ve got bubbles inside the stone, it’s glass. Full-stop. Bubbles do not naturally occur in 99% of gemstones but they’re very common in glass imitations.
Distinguishing the stone from other stones using a loupe is a little bit trickier. You need to know a bit about the sorts of inclusions that end up in the stone. The light I recommended with your loupe should let you get a look into the majority of rough gemstones, those which are too included to allow light to pass are an exception.
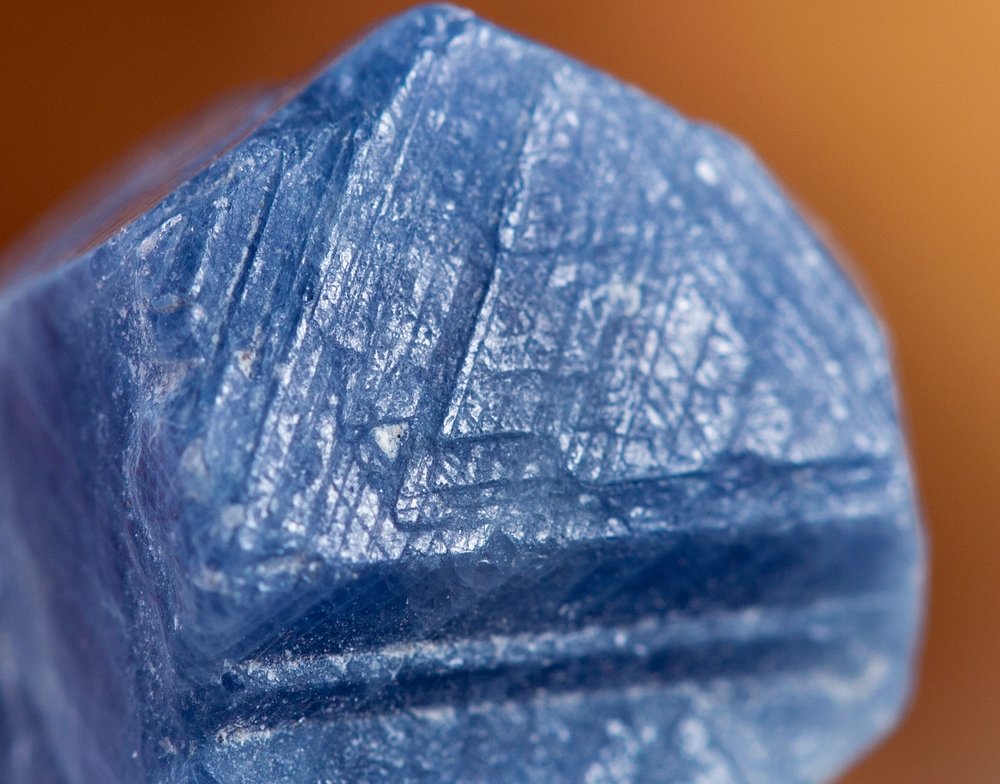
One of the biggest problems with identifying sapphire, compared to other gemstones, is that it actually occurs in a massive form. That doesn’t mean it’s huge, although low-to-mid-grade corundum can be found in relatively large pieces, but instead means the stone is comprised of a bunch of interlocked crystals without a specific external shape.
Compare to the well-known octahedral shape of rough diamonds, which are a big tell that the stone is more than it appears.
So, instead of looking at the external crystal structure, we’re left peering into it. Most rough sapphire will have enough transparency to let you look through it, but cabbing-grade stones may be almost 100% opaque. Any sapphire with a milky or worse transparency isn’t worth much.
Inclusions can also let the experienced gemologist know if the stone was heat-treated to improve color since it alters some of the internal structures of the stone.
This is the only qualitative test that I recommend if you’re trying to identify a rough sapphire. It’s far better to rely on yes/no tests or those that will give you hard numbers as a result.
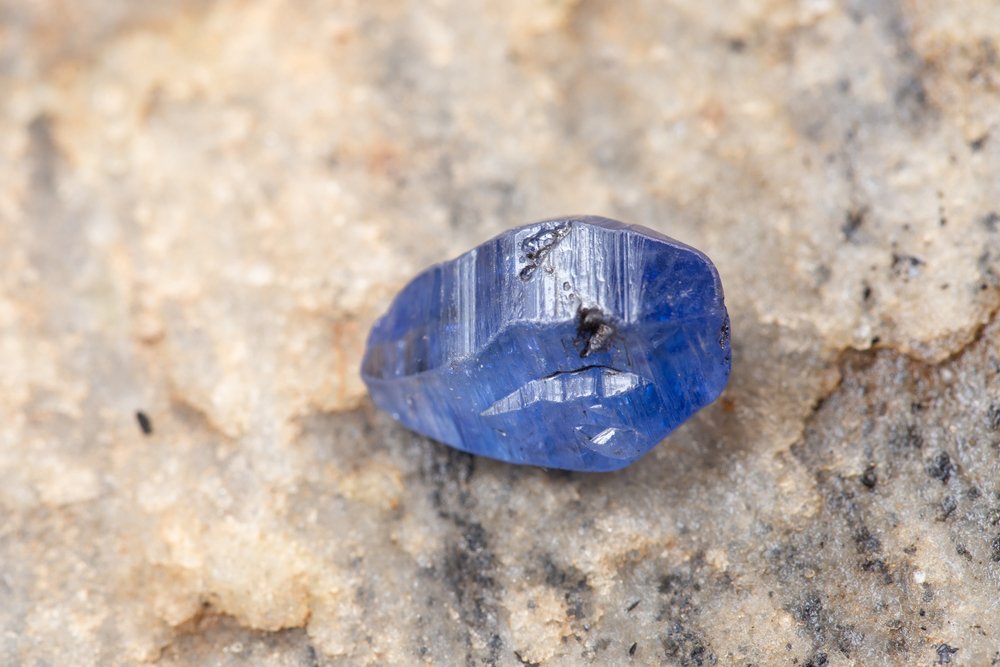
Common Inclusions
Sapphires won’t have bubbles, but the following are common inclusions in corundum varieties:
- Feather- Usually a single, tiny crack somewhere in the stone that resembles a feather. These are quite common but they can also cause structural issues for those cutting the stone and you should take note of any particularly large feather inclusions.
- Needles- These often occur in groups and refract light to make small rainbows when viewed under a loupe. They’re rather common in some varieties of sapphire, and when they occur at crossing angles as rutile they’re sometimes referred to as “silk.”
- Fingerprints- Resemble small fingerprints, they’re usually a healed fracture within the stone from its initial crystallization.
- Crystals- In some cases, you may find another included crystal that’s formed inside of the sapphire. These can be a wide variety of minerals and may form large, ugly inclusions or small ones that give a bit of character to the stone.
- Halos- Sometimes found around other inclusions, these are formed of small cracks that occur due to other inclusions.
These aren’t the only inclusions you’ll see in sapphire but the above should cover it. In particular, fingerprint inclusions are a good indication that you have sapphire in your hands. Any of these indicates that you have some sort of natural stone, since lab-created corundum has different inclusions and glass will only have small air bubbles scattered throughout the stone.
Small, perfectly round bubbles are a good indicator that whoever sold you the rough is about to have a tough time while you try to get a refund. They don’t occur naturally in sapphires, but you shouldn’t confuse them for cavities that form intersecting the surface of the stone.
Testing Streak and Hardness
Corundum leaves a colorless streak. Take it to a testing plate, scrape the rough stone a bit on the plate, and take a look at what’s left behind. If it’s white (or mostly invisible on a white streak plate), then you’ve got the right color.
Any color at all is an indication it’s either not a sapphire or you ended up with rough someone dyed. The latter should be suspected if the streak is the same color as the stone appears while you’re holding it. Most gemstones are colored by impurities trapped in their matrix, the mineral itself isn’t the same color.
Hardness testing is a good indicator. Few stones actually reach the 9 indicated in the literature by corundum, you can’t fake this property with glass or some tricky chemical work. It’s just an innate property.
The easiest way to test at home is to simply use the sapphire to scratch a known mineral with high hardness. Quartz is great for this purpose since it’s readily available and sits at a 7 on the Moh’s scale. A sapphire will easily scratch a bit of quartz.
Topaz is an 8 on the Moh’s scale but it’s less available than quartz. A bit of topaz won’t scratch a sapphire. Instead, it will slide off just like if you tried to scratch a piece of glass with a kitchen knife.
These tests are an almost 100% identifier, since few things are harder than quartz.
Testing Specific Gravity
Specific gravity, or density, is relatively simple to test at home. You’ll need a scale, however, preferably one that has a resolution of at least two decimal points. You’ll be using metric measurements for this, although you could theoretically convert the numbers afterward.
It’s just much easier to stick with metric measurements since that’s the information you’ll find when looking things up.
Try to find a scale that can measure at least 300 grams for ease of use. A lot of cheaper small scales only read up to 100 grams, which may not be enough water for the process.
You’ll want to do the following:
- Weigh the stone directly on the scale and record the number. This is the “in-air” weight of the stone.
- Use a bit of wire or a paperclip to make something to hold the stone easily.
- Put a cup of water on the scale, it should weigh less than the scale’s capacity for obvious reasons. Zero the scale
- Put the paperclip, wire, or other holding devices into the water at a known distance. Marking the tool at the point of insertion helps. Zero the scale again.
- Place your suspected sapphire in your holder and put it back into the measured distance. Do not touch the bottom or sides of the cup. Record this number, it’s your “in-water” weight.
- Divide the weight “in-air” weight by the “in-water” weight, this number is your specific gravity in g/cm³
The specific gravity of sapphire runs from 3.98-4.06 g/cm³ and your numbers should match that range if it’s a real sapphire. Be aware that it may go just a touch over or under the values without a true hydrostatic scale setup but the number should be very close to that range.
If you go through all three of the above tests and know the provenance of the stone, chances are you now know for sure whether or not you have rough sapphire on your hands!
As noted above, if it’s a particularly large or colorful piece of rough you may still need a gemological assessment in order to sell the stone for its true value. That will usually run you a few hundred dollars, depending on the lab, but it’s the best way to show confidence in your stone if you’re selling.
If you’re not selling? Well, then it’s time to enjoy your newly confirmed sapphire!
- Online rock and mineral club for collectors of all levels!
- Find community with like-minded rock and mineral enthusiasts.
- Monthly Giveaways!
- Free Access to Entire Digital Library of Products (annual memberships)
