One of the most valuable tools a prospective rockhound can have on hand is a UV light in the right spectrums. These lights can cause certain minerals to fluoresce, making them easy to identify at night, and also help you with identification at home. It’s just a matter of gathering together the right knowledge.
So, let’s break out our e-tools and get ready to search some gravel, and I’ll teach you a bit about rockhounding at night with ultraviolet light.
Why a UV Light?
As rockhounds, we tend to visually identify our finds as we’re walking along. At night, this becomes much more difficult even when you have a good flashlight on hand.
But many kinds of stones actually glow underneath the light of a UV lamp. This means you can rockhound with a UV light at night in order to find interesting stones or to find specific stones you know are in the area.
The key here is that many stones are fluorescent, meaning they absorb the ultraviolet light from the lamp or light and release it in a different part of the spectrum. Specifically, one that’s visible to the human naked eye.
It’s a little bit more complicated than that.
The basics are simple, however: ultraviolet light is mainly invisible to the naked eye, but it excites the electrons in a mineral (or other material) that displays fluorescence. The compounds which absorb the UV light, known as phosphors, then drop the electrons back to their initial state. The overall effect means the UV energy has been lowered to produce light in the visible spectrum.
But, all we really need to know as rockhounds is that ultraviolet light makes certain rocks glow.
What Kind of UV Light Do I Need?
UV comes in both shortwave and longwave forms, and they have different applications.
The type of ultraviolet light depends on the wavelength of the light that’s being produced.
As a general rule, you want something in the 365nm range for rockhounding. This is technically in the longwave portion of the UV spectrum, with shortwave UV being lower at around 250nm or less. Anything 200nm or under is dangerous, but they’re generally not available to the public, especially in a transportable form.
395nm lights are common, and usually cheaper, but I’d avoid them since they won’t highlight the full range of minerals.
Shortwave lights tend to light things up better, with some people even building lights lower than 365nm themselves. You can improvise a light, even using your cell phone, but a purpose-made light is probably best. Some rockhounds make their own, but I recommend just picking something up.
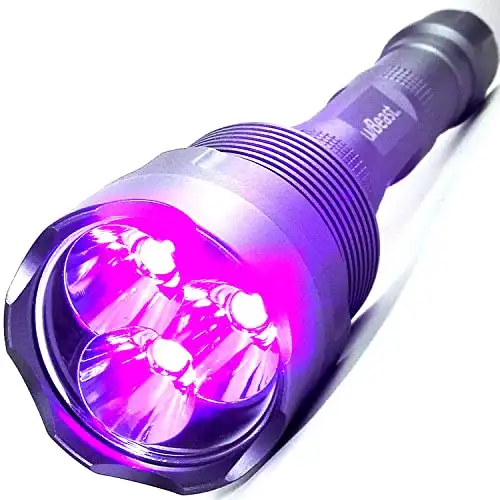
I’m a big fan of the UVBeast lights, which are available in a few sizes and wavelengths. The linked one is a 365nm flashlight model which works great for hunting at night.
For collectors with displays, or people looking for very specific minerals, it’s worth it to seek out a blacklight filter as well.
This blocks the majority of visible light that emerges from the diode and allows for minerals to fluoresce in different colors, instead of the blue-purple most fluorescent minerals return. They’re useful, but for hunting at night I feel it’s often better to have a bit of visible light to see with.
What Kind of Minerals Can a UV Light Detect?
There are a huge variety of different minerals that display some level of fluorescence. The following list is incomplete, but covers some of the more common finds you’ll see:
- Fluorite
- Apatite
- Calcite
- Sodalite
- Opal
- Scapolite
- Zircon
My recommendation is to take a look and see what minerals are in the area you’re hunting in, then find out if any of them are known to fluoresce.
In one area I hunt, for instance, the only UV-reactive mineral of note is calcite. I can quickly sort through a ton of rocks to find those with calcite and either keep or remove them depending on my goals for the trip.
Know what you’re hunting for and you’ll be ahead of the curve.
Tips for Rockhounding With Your UV Light at Night
Rockhounding with your UV light is pretty straightforward, provided that you have the right light. With that accomplished, you can focus on finding interesting minerals instead of wondering if your light is working.
I do recommend testing a light before you go out. Just shine it on a UV-reactive stone in your collection or white paper (which should glow blue) to ensure that it’s in working order.
Using Your UV Light in the Field
It takes a bit of time to get your eyes used to finding the glow, particularly if you’re not using a visible light filter. The majority of stones will glow blue when put under a standard UV light, with some displaying green or other colors depending on your light’s participation in the visible spectrum.
It’s often best to bring a standard flashlight along with you as well. Rockhounding is often done on uneven ground and you need to be able to see to avoid injury.
I’d recommend having some experience in the area you’re searching during daylight hours before going night hunting with a UV bulb. Some of the areas I hunt are much more treacherous than they look, and knowing what to avoid is much easier when you’ve seen it in daylight.
On the other hand, you can also just get started with gravel in your front yard. You might be surprised at how much calcite and other common fluorescent minerals show up in commercial gravel mixes.
The process is pretty simple at its most basic: shine your UV light on stuff and pick up anything that glows.
Organizing Your Search
I also recommend bringing along an E-tool or other small shovel. I mainly use them to scrape and spread out layers of rocks at night, rather than actually digging. I do this for a few reasons:
- It’s faster and easier on the hands than spreading the layer without a tool.
- Sorting layers and going through them with my UV light is the quickest way to “process” a small area.
- Scorpions. Ours are nocturnal and very common in some areas. Fortunately, they’re also fluorescent but that doesn’t help if you’re reaching into unknown areas with bare hands.
I’ll then scrape that layer to the side and spread another layer out until I’m moving to the next area.
As a general rule, I disassemble the piles before I move to the next area. It’s better than leaving heaps of rocks all along your searching area.
If you find a spot that looks good for digging, I’d recommend marking it and coming back during daylight hours.
Nighttime Safety
Night brings some additional safety concerns that you don’t worry about much during the day.
The main one is visibility. It’s easy to trip and hurt yourself when you can’t see where you’re going. I just bring along a standard flashlight and walk carefully. I try not to get more than 2-3 miles out at night, especially if I don’t have a partner with me.
One big thing: know what the local nocturnal fauna are before you head out.
Most animals aren’t much of a threat to humans.
My favorite river bed is just full of coyotes and bobcats at night and it’s a semi-rural area which means they’re wary but not exactly scared of people. I carry a 24” length of red oak dowel in my belt just in case, but I’ve only had to wave it at curious animals a couple of times in dozens of trips.
On the other hand, we also have scorpions and tarantulas that are out at night. The former has a nasty sting. Tarantula will kick hairs at you when cornered, which is… unpleasant. They make itching powder out of ground urticating hairs.
The key here is just being aware of your surroundings and what might be in them at all times.
If you can manage that? Well, a UV light is a great way to take your local collecting to the next level.
- Online rock and mineral club for collectors of all levels!
- Find community with like-minded rock and mineral enthusiasts.
- Monthly Giveaways!
- Free Access to Entire Digital Library of Products (annual memberships)
